Creating an AI calling agent to manage appointments for a health clinic can provide high-value customer support services that significantly reduce administrative and support staff costs. In this guide, I will explain how, with just a few tools and in less than 15 minutes, you can set up an outbound AI phone agent that calls patients to remind them of their upcoming appointments, confirm them, or reschedule them.
To create our bot, we need the following tools:
- Callin.io for managing phone calls
- Google Calendar
- OpenAI ChatGPT
- Make.com
Creating the Outbound AI Agent on Callin
To create a tool that can manage the calendar of a medical clinic and reschedule patient appointments if necessary, you first need to create an AI phone agent trained with a specific prompt tailored to the task.
The mission of this agent is simple:
- Remind patients of their appointments.
- Suggest a new date if the patient is unavailable.
- Delete the old date from the clinic’s Google Calendar.
For convenience, I have created two distinct scenarios on Make.com:
- The first scenario is designed only to remind patients of upcoming appointments, 24 hours before, and to ask for confirmation or rescheduling. In the case of rescheduling, the bot proposes a new date and updates Google Calendar with the new appointment.
- The second scenario sends a confirmation email to the doctor when the patient approves the date and time of the appointment or, alternatively, cancels the old appointment if rescheduling is requested.
The First Scenario
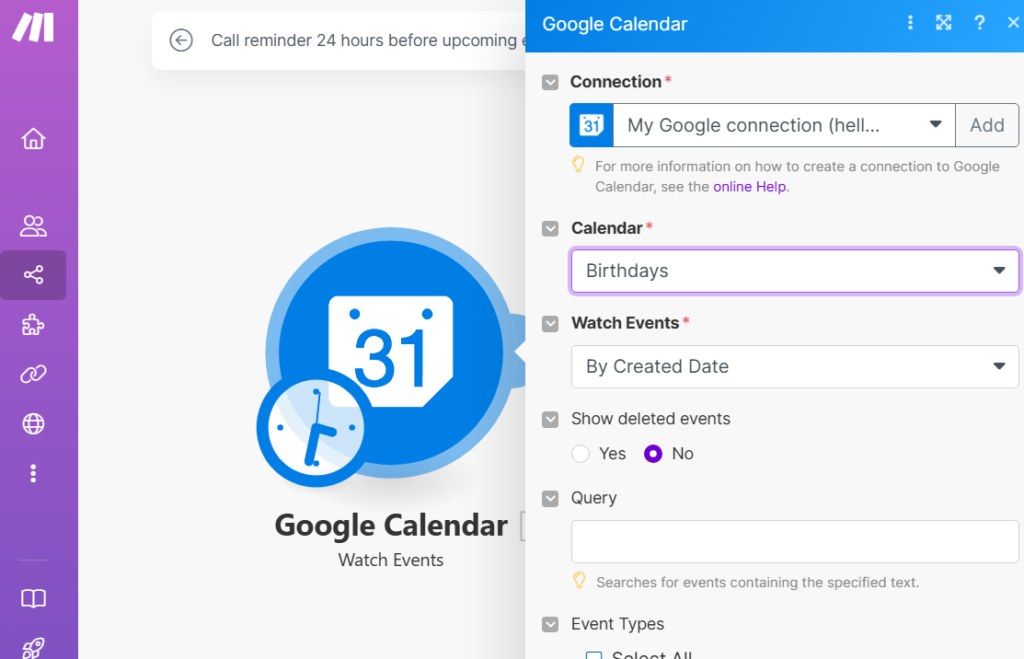
The first scenario is structured as follows (see the image). It uses the Watch Events module of Google Calendar, where you input your Calendar ID and the criteria for searching events. In this case, I selected ‘By Created Date’.
The second Make.com module extracts the patient’s phone number from the description (or even the title) of the events, depending on the case. As shown in the image, I used OpenAI ChatGPT. The specific module is called Create a Completion (ChatGPT), but you can use several alternative modules to achieve the same result.
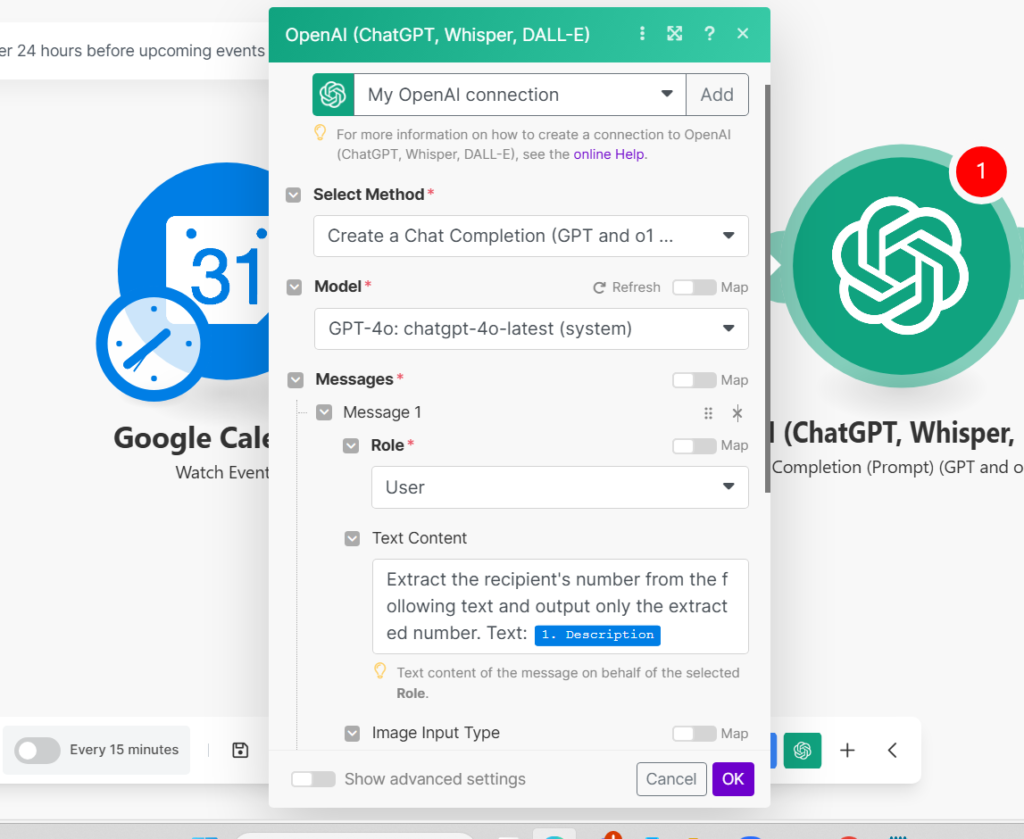
After adding the module to the scenario, select the ChatGPT model to use (any model works) and click Add Message. Select ‘User’ as the ‘role’ and input the following prompt to extract the phone number from the event description in Google Calendar:
“Extract the recipient’s number from the following text and output only the extracted number, text: [description].”
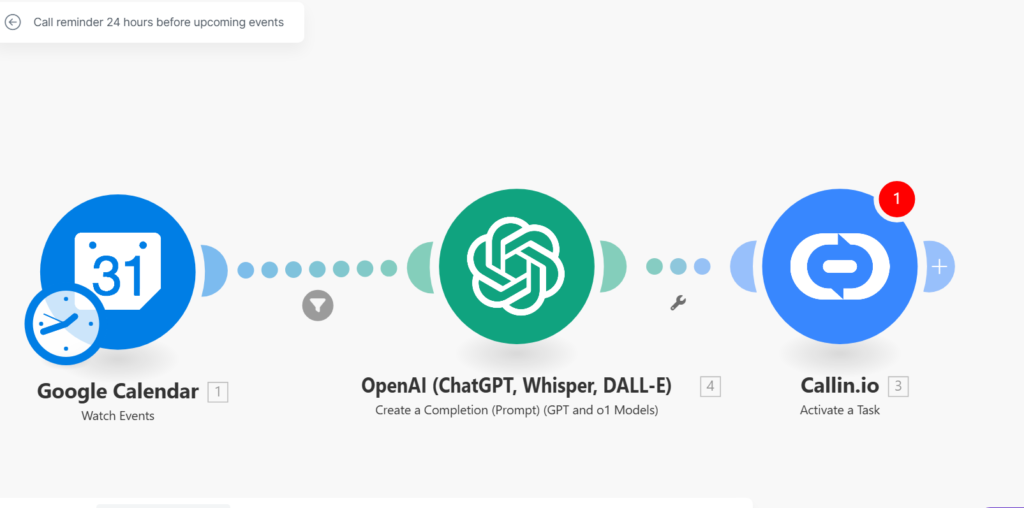
The third and final module, as shown in the above image, is Callin.io’s Activate a Task. I installed the Callin.io module by registering on the website, going to the Actions tab on the dashboard, and clicking the Make Integration button at the top right. I then created a new task (a new AI phone agent).
Continuing with the creation of the phone agent, here is the prompt I assigned to my AI calling bot created on Callin.io:
AI Agent Prompt on Callin.io
Greetings:
“Good day, this is Gladys from Thorpe Dental Group. May I kindly speak with @recipient.name@, please?”
Prompt:
- If the client answers:
“Hi [Client’s Name], I’m reaching out to remind you about your upcoming dental appointment with us at the Bishopthorpe Clinic.” - If someone else answers:
“Thank you. Could you please inform [Client’s Name] that we’re calling regarding their dental appointment?”
Appointment Details:
“The appointment is set for [Day of the Week], [Date], at [Time]. It will take place at our practice located at Main Street 123, London.”
Confirmation Request:
- If confirmed:
“Fantastic! We’re excited to see you then. If you have any questions or need to adjust the timing, feel free to call us at 0184 003407.” - If rescheduling is needed:
“Of course, no problem. Let me take a quick look at our schedule to find a better time for you. [Proceed to reschedule.]”
Closing:
“Thanks, [Client’s Name]. We’ll see you on [Date]! Have a lovely day. Goodbye!”
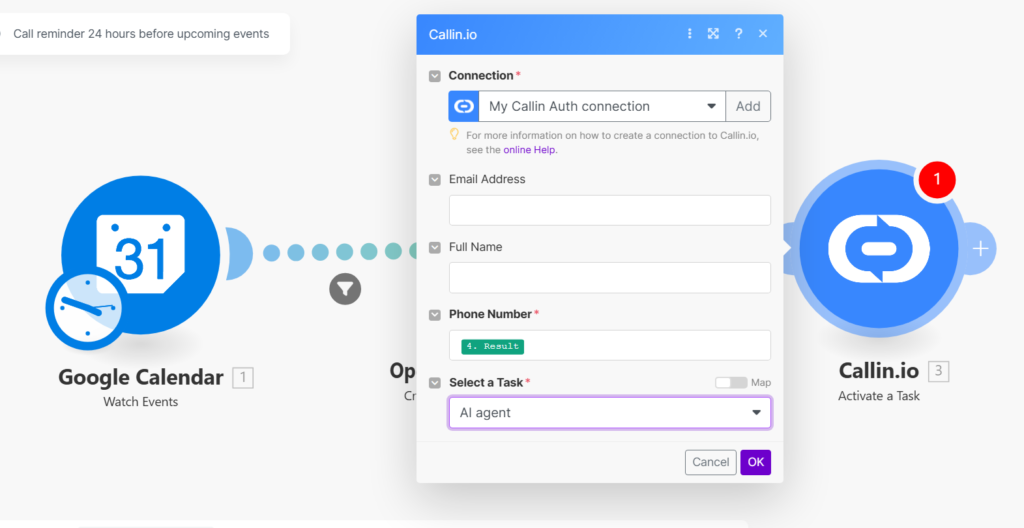
After setting up the AI agent on Callin.io, I returned to Make.com. In my active scenario, I input the phone number field (extracted from the ChatGPT module) into the Activate a Task module in Callin.io and selected the previously created task (AI phone agent).
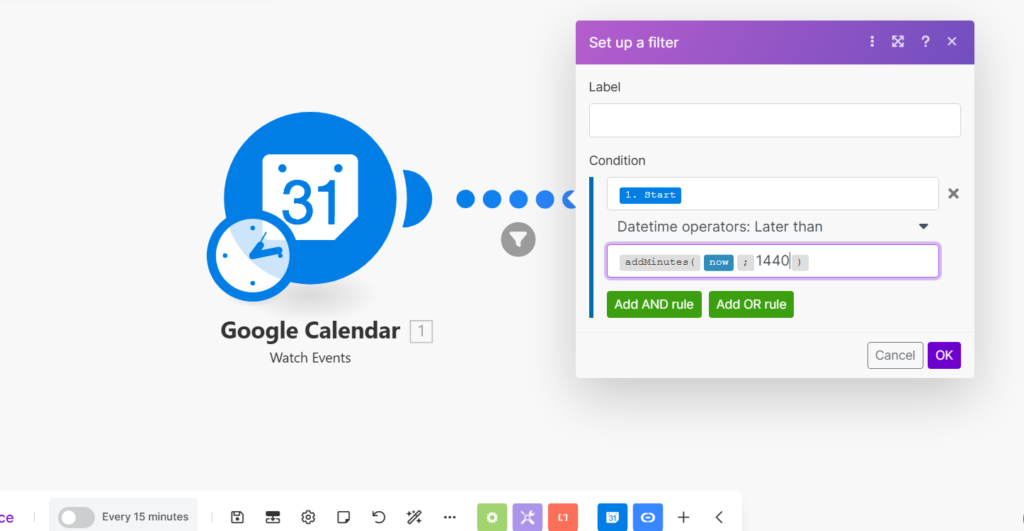
The scenario is almost ready; however, we need to include a filter between the first Google Calendar module (Watch Events) and the second ChatGPT module to activate the AI phone calls at a predetermined time before the event and not every time the scenario runs.
In the example shown in the image above, I set a time of 1,440 minutes as the interval before executing the next action (AI phone call).
Now that the first scenario is operational, let’s proceed with the second:
AI Calling Bot Set to Confirm Appointments via Email or Cancel Previous Ones
Premise:
Considering that one of Callin.io’s features is the ability to set appointments in Google Calendar, if during the initial reminder call the patient indicates they want to reschedule an appointment, we only need to delete the old appointment. To do this in the Make.com scenario, we will use the ‘delete events’ module instead of the ‘update events’ module in Google Calendar. Let’s proceed step by step.
Step 1: Importing Call Transcriptions
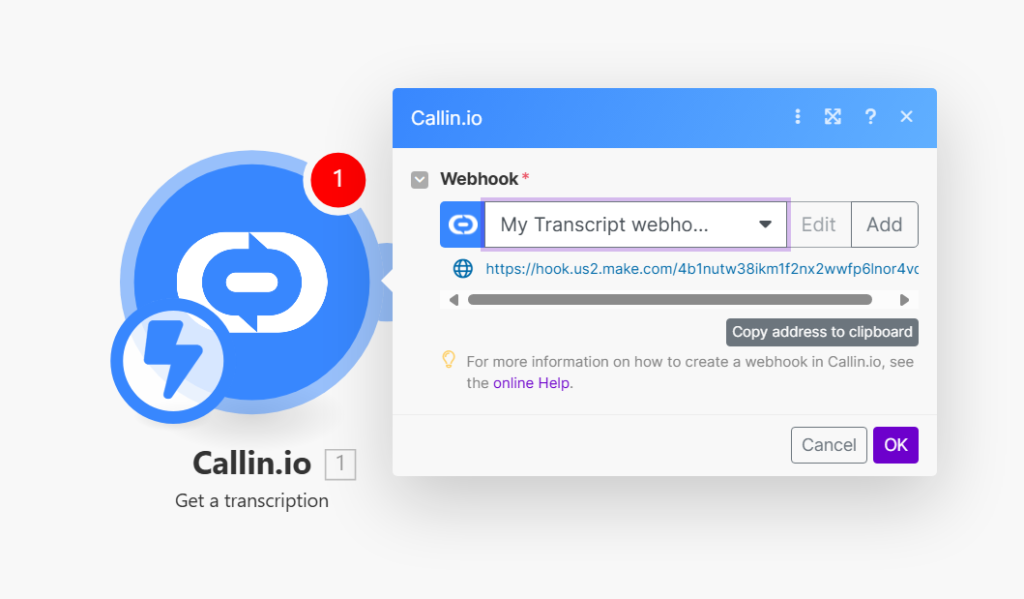
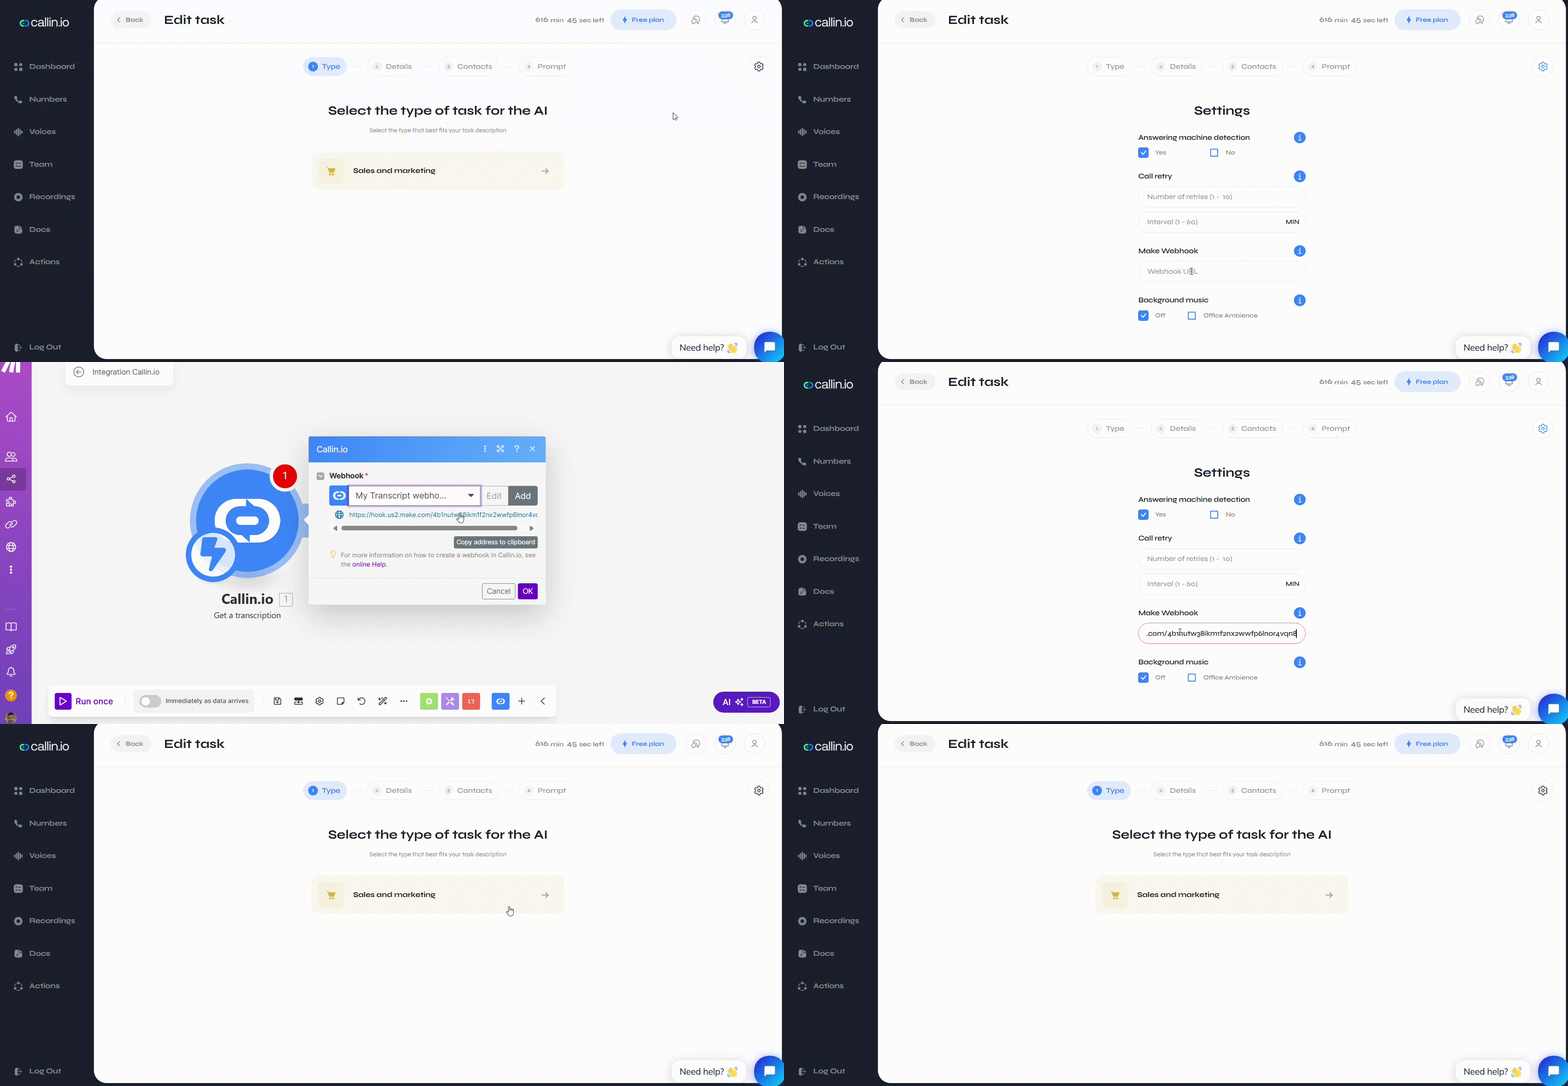
- As the first module of the scenario, use the ‘get a transcription’ module by Callin.io. Click on the ‘add’ button and then copy the generated link by clicking on ‘copy address to clipboard’.
- This module will allow us to import into Make.com the transcription of the phone conversation held by our previously created AI phone agent. However, to complete this process, we need to paste the generated link directly into the settings section of the task in Callin.io, in the ‘make webhook’ field as shown in the image below (once pasted, no further action is needed as it auto-saves).
Step 2: Processing the Transcription with OpenAI ChatGPT
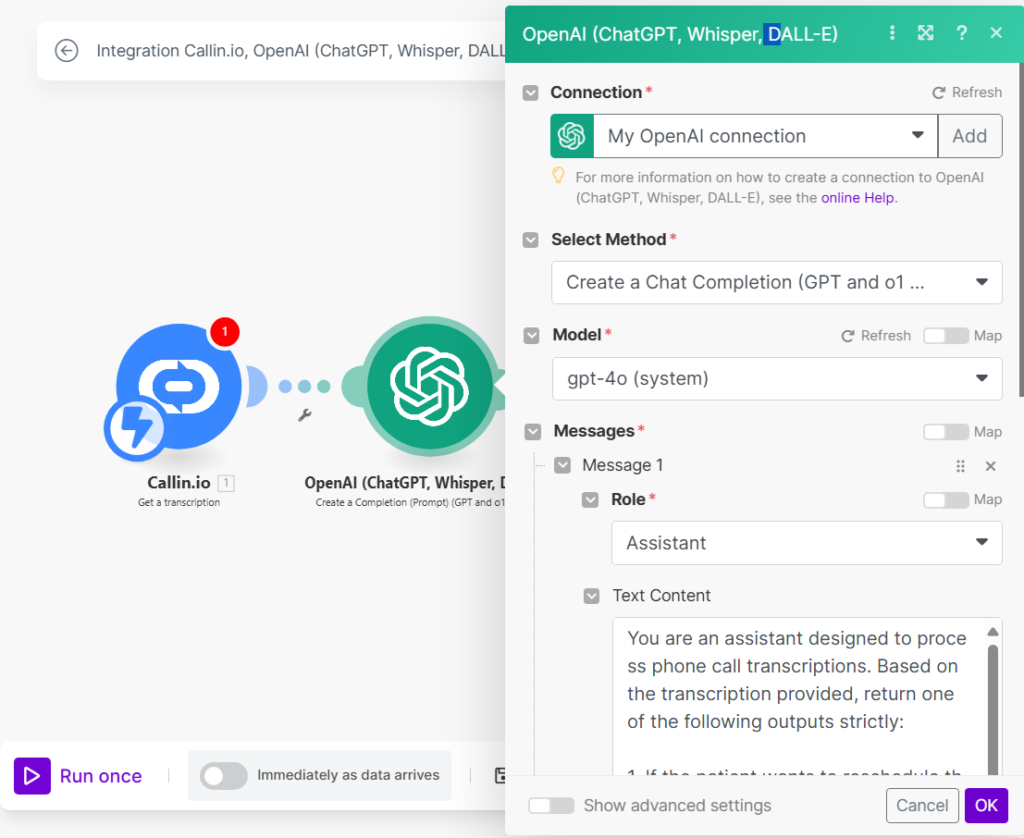
- Return to the Make.com scenario and add a second module from OpenAI ChatGPT called ‘create a completion’. In the prompt field, insert the following:
You are an assistant designed to process phone call transcriptions. Based on the transcription provided, return one of the following outputs strictly: 1. If the patient wants to reschedule the appointment, return only the query required to search for the event in Google Calendar. The query must be in the format: "<Event Title>" OR "<Date>" OR "<Other identifiable information from the transcription>". 2. If the patient confirms the appointment, return strictly "yes". 3. If the patient does not answer the call, return "no answer". Do not provide any explanation, additional text, or comments—just the required output. Here is the transcription: {{1.transcript}}
This module will allow us to obtain from the examination of the conversation transcription three alternative types of output:
- Title and description of the event to be canceled (if the patient reschedules).
- The output ‘yes’ to send an email confirmation to the patient who, conversely, confirms the appointment by phone.
- ‘No answer’, in case the patient does not answer the phone.
Step 3: Setting Up the Router and Filters
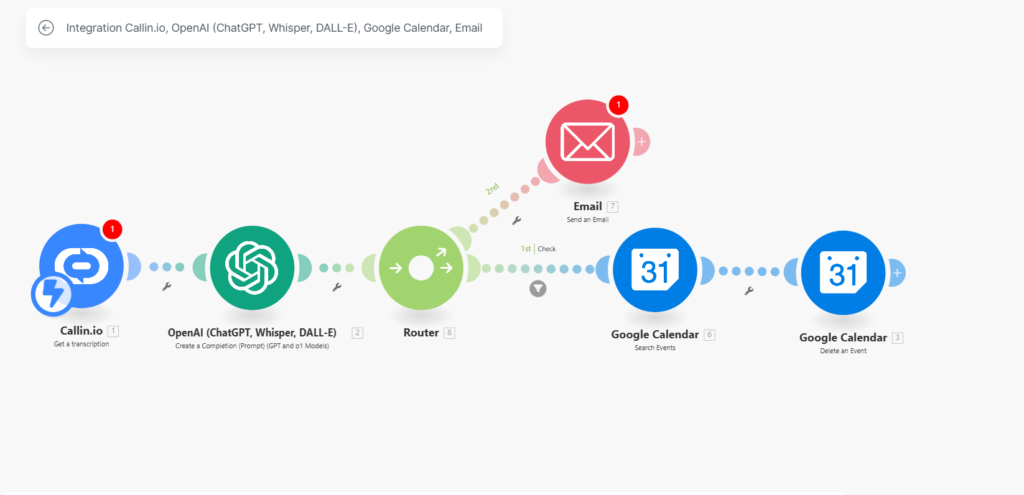
Proceed by adding a ‘router’ as the third module and create a bifurcation leading to two alternative subsequent modules: a Google Calendar ‘search events’ module (to identify the event to be deleted in case of rescheduling) and an email module called ‘send an email’ to send a confirmation email to the clinic owner if the appointment is confirmed.
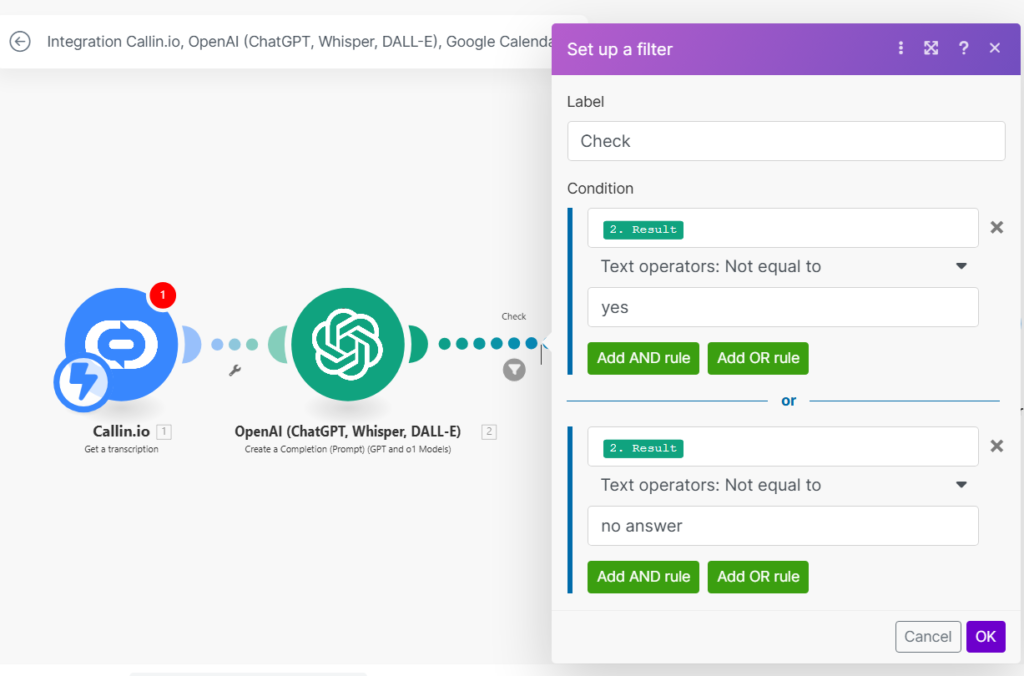
- Apply the following filter between the Router and Google Calendar modules: if result (output from ChatGPT) is not equal to ‘yes’ and not equal to ‘no answer’. This filter will allow us to proceed to search and subsequently delete events if the patient has responded and expressed the desire not to confirm the appointment.
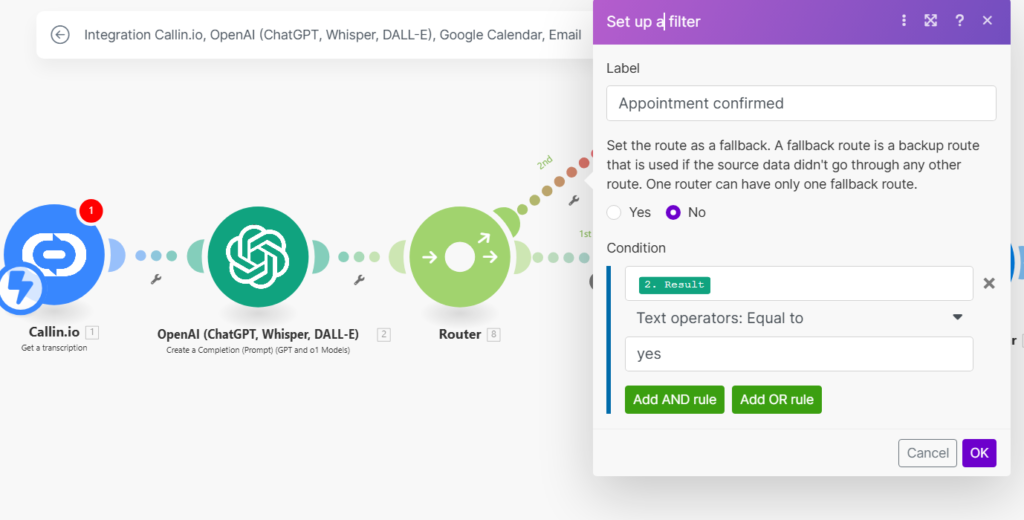
- The second filter to apply between the Router and the ‘send an email’ module should be set as follows: result (output from ChatGPT) is equal to ‘yes’. This allows us to process patient appointment confirmations by sending an email to the doctor. You can customize the email as desired by populating the ‘subject’ and ‘content’ fields (I simply entered: the appointment is confirmed). Check the following graphics.
Step 4: Searching and Deleting Events in Google Calendar
- Return to the Google Calendar ‘search events’ module. After connecting your calendar as shown in the graphical example, apply a query that filters appointments (‘events’) based on the information extracted from the conversation about the previous event to be deleted, as per the patient’s request. Therefore, the query to apply in this case will be the ‘result’ from the ChatGPT module.
- Finally, after this module, concatenate the last module of the scenario, which is the ‘delete event’ module in Google Calendar. This allows us to delete the event found in the previous step. To do this, add the ‘delete an event’ module, select your Calendar, and enter the ‘event id’ field with the output from the previous module (search events).
Now everything is set. The scenario is ready to be used. You can perform the necessary tests before offering it to health clinics and medical offices. This is just a simple flow; you can add more complex automations that better meet your needs by structuring ChatGPT outputs in JSON format or adding a myriad of other modules (like Twilio SMS for notifications or reminders via SMS).
You can donwload the 2 scenarios here:
- first scenario (appointments reminder)
- second scenario (email confirmattion or delete appointments).
I hope this guide has been helpful. Have a great day.

Helping businesses grow faster with AI. 🚀 At Callin.io, we make it easy for companies close more deals, engage customers more effectively, and scale their growth with smart AI voice assistants. Ready to transform your business with AI? 📅 Let’s talk!
Vincenzo Piccolo
Chief Executive Officer and Co Founder

